Category Archives: Organizing

Using Facebook To Sell Things

Using Facebook To Sell Things

In my book, Border Hoarders, I talk about the many places you can take your unwanted things. Facebook never entered my mind until I was on there today and I saw a friend list several things she wanted to get rid of. My home page was flooded with pictures of items she no longer wanted, along with a description and price she wanted for each one. I kept an eye on them through out the day and I was surprised to see how many people actually wanted these things! There were several items that even had more than one person wanting it!

If you have a lot of friends on Facebook, this can be a great way to sell things you don’t want – and it’s free! After seeing how she did things, I’ve come up with a few tips for you in case you want to try this yourself:

*Take a good picture of each item.
*Make a new post for each item.
*Give each one a good description.
*Either list the price you want or let people know you’ll take the best offer.
*Wait until you have several items that you can put up all at once. If you do a little at a time, day after day, people might get annoyed and unfriend you.
*You can make an album on Facebook called “items for sale” and you can add to this every once in while. When you do, put a post on your page that says “I just added more to my ‘for sale’ album. Come check it out”. Just make sure to delete pictures of items that you’ve already sold.

I might try this out next time I have some things I want to get rid of!
Fun With Cafe Rods

Fun With Cafe Rods

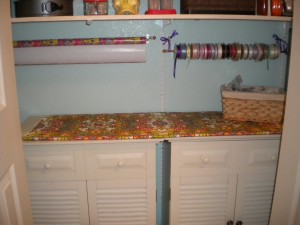
I love cafe rods almost as much as I love tension rods. There are so many things you can do with them! Today I was wrapping some gifts for my daughter’s birthday and thought about how nice it would be to have a place to put my wrapping paper. I always keep it standing up in a corner of my closet and it gets unrolled and crinkled too easily. Then it hit me – cafe rods!

I installed one under a shelf in a closet (husband not required for assembly) in about five minutes. Before, it was just wasted space. Now it’s a great place to store my wrapping paper. I added another one right next to it for ribbon. My ribbon stuck out a little too far and the bar wouldn’t sit in the little hooks. That’s ok! I just hung the bar from some ribbon! Maybe the next time I’m at Home Depot I’ll pick up some bigger brackets for it…or maybe not. I kind of like the way it looks. The best part is, they were only $2.50 a piece.

Cafe rod for wrapping paper and ribbon

Tension Rod Divider

Tension Rod Divider

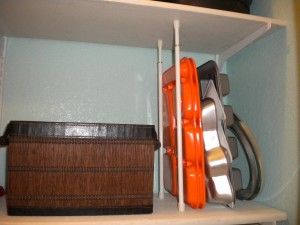
I love tension rods. They are super cheap and there are so many things you can do with them. One of my favorite uses for a tension rod is to use them in a pantry or closet to store muffin pans and cookie sheets in an upright position. This can save you a lot of room versus lying them flat on the shelf.

Tension rod divider

To use tensions rods in this way, first measure the amount of vertical space you have between shelves. Tension rods come in different sizes and you want to make sure you don’t buy one that is too long. You can buy tension rods at just about any discount store and they are usually just a few dollars a piece. If you’re going to prop up one side of the pans against a wall you will only need two rods. If you’re going to put them in the middle of a shelf you’ll need to buy four (two for each side).

Simply attach the tension rod up and down at the front of the shelf and put the second one directly behind it towards the back of the shelf. If you’re putting this in the middle of your shelf do the same thing a few inches away. Now you can save space and store your thin pans upright!

Organizing a Hall Closet

Organizing a Hall Closet

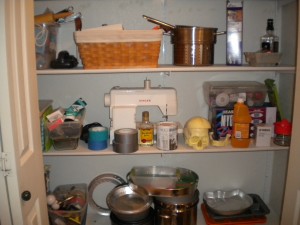
I have this large closet in my hall way that I use to store all kinds of things – extra pots and pans, cleaning products, craft items, home school stuff (see the skull, it’s not real I promise)….pretty much anything I can’t find a home for. Yesterday when I opened it up to take something out I thought about how boring and bland it was. It’s so depressing to look in there! Plus things were starting to get out of hand in there – time to make a change!

Before

By nature I’m not an organized person, I have to really work at it. I’m a willy nilly, fly-by-the-seat-of-your-pants kind of gal. I don’t like structure or schedules and I would rather be making messes than cleaning them up. I have learned over the last few years that the best way for me to stay organized is to also make things beautiful. If my closet is pretty, I will keep it clean and organized. This closet needed to be a little prettier…and cleaner.

All it really needed to spruce it up was a little paint. I had some left over paint from a bathroom I painted a few weeks ago. The great thing about painting a closet is it forces you to take everything out first. Once everything was out and the closet was painted I was able to look at the space I had and all the things that were originally in there. I discovered that a lot of it I really didn’t need any more. I filled three garbage bags full of stuff to take to Good Will.

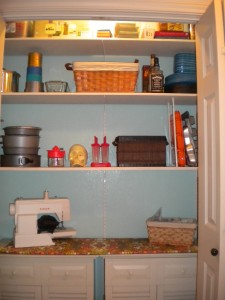
Before I started painting the closet, I had five shelves in there. After getting rid of things I didn’t need any more I decided to only put three back up. This gave me space at the bottom to bring in two cabinets I had sitting in my garage. These cabinets not only made the closet look a little nicer but it gave me some drawer space to put my large kitchen utensils that I don’t use very often.

After

I like the way my closet looks now and it’s much more organized. I can very easily see exactly what’s in there.

Below are a few great tips to organize your closets:
*Use baskets to hold both large and small items
*Use two tension curtain rods and attach to shelf vertically, one in front of the other, up against the wall. Use this space to store muffin pans and other slender items upright (see picture).
*Paint the walls a fun color, just make sure the paint is completely dry before putting shelves and other items back in.
*Put seldom used items at the top of your closet and items you use more often towards the middle or bottom so they are easier to get to.
*Don’t put boxes or other paper items too close to the light on the top shelf. This could cause a fire.

Happy organizing!